Implementing a Simple CAPTCHA in ASP.NET
Introduction
Implementing a Simple CAPTCHA in ASP.NET website is a straightforward and effective way to prevent automated bots from abusing your forms. This blog post will walk you
through implementing a simple CAPTCHA in an ASP.NET application using HTML, CSS, and JavaScript.
Step 1: Setting Up the CSS
First, we need to create a CSS file to style the CAPTCHA container and elements. Below is the CSS code for the CAPTCHA container and the buttons.
#captchaContainer {
    width: 600px;
    background-color: #fff;
    border-radius: 5px;
    padding: 10px;
}

#captchaContainer input[type="text"] {
    width: calc(70% - 10px); /* Adjusted width for padding */
    padding: 10px;
    margin-bottom: 10px;
    border: 1px solid #ccc;
    border-radius: 3px;
    box-sizing: border-box;
    display: inline-block;
}

#captchaContainer #lblMessage {
    text-align: center;
    color: red;
    margin-top: 10px;
    margin-left: -4px;
}

.button_css_blue {
    margin: 0 15px 0 0;
    background-color: #003F51;
    border: none;
    color: #FFFFFF;
    padding: 9px 23px;
    text-align: center;
    text-decoration: none;
    font-size: 12px;
    border-radius: 8px;
}

.button_css_blue:hover {
    text-decoration: none;
    background-color: #0056b3;
}

.button_css_blue:active {
    background-color: #299dae;
    transform: translateY(2px);
}
Step 2: Creating the CAPTCHA Script
Next, we create the JavaScript file captcha.js to handle the CAPTCHA generation and validation.
// Created / Generates the CAPTCHA function
function DrawCaptcha() {
    // Generate CAPTCHA on page load
    var a = Math.ceil(Math.random() * 9); // First random number (operand)
    var b = Math.ceil(Math.random() * 9); // Second random number (operand)
    var operator = Math.random() < 0.5 ? '+' : '-'; // Randomly select addition or subtraction
    var code = a + ' ' + operator + ' ' + b + ' ='; // Construct CAPTCHA code
    document.getElementById("txtCaptcha").value = code;
    document.getElementById("lblMessage").innerHTML = ""; // Clear error message on refresh
    document.getElementById("btnCheck").style.display = "inline"; // Show Check button
}

// Validate the entered input against the generated security code function
function ValidCaptcha() {
    var str1 = document.getElementById('txtCaptcha').value;
    var str2 = document.getElementById('txtInput').value;
    // Calculate the correct answer based on the operator
    var answer;
    if (str1.includes('+')) {
        answer = parseInt(str1.split('+')[0]) + parseInt(str1.split('+')[1]);
    } else if (str1.includes('-')) {
        answer = parseInt(str1.split('-')[0]) - parseInt(str1.split('-')[1]);
    }
    // Check if the entered answer matches the correct answer
    if (str2 == answer) {
        // CAPTCHA is valid
        document.getElementById("btnCheck").style.display = "inline"; // Show Check button
        document.getElementById("lblMessage").innerHTML = "Verified"; // Display success message
        document.getElementById("lblMessage").style.color = "green"; // Set color to green
    } else {
        // CAPTCHA is invalid, show error message
        document.getElementById("lblMessage").innerHTML = "Invalid CAPTCHA";
        document.getElementById("lblMessage").style.color = "red"; // Set color to red
        document.getElementById("btnSubmit").style.display = "none"; // Hide Submit button
    }
}
Step 3: Integrating CAPTCHA in the Web Page
Finally, we need to integrate the CAPTCHA in the ASP.NET webpage. Below is the HTML markup for the CAPTCHA container.
<!DOCTYPE html>
<html>
<head>
    <title>Captcha</title>
    <link href="/css/captcha.css" rel="stylesheet" type="text/css"/>
    <script type="text/javascript" src="/js/captcha.js" />
    <script type="text/javascript">
        // Call the DrawCaptcha function when the page is loaded
        window.onload = function () {
            DrawCaptcha();
        };
    </script>
</head>
<body>
    <div id="captchaContainer">

        <input type="text" id="txtCaptcha" readonly />
        <input type="button" id="btnrefresh" value="Refresh" onclick="DrawCaptcha();" class="button_css_blue"/>
        <br />
        <input type="text" id="txtInput" placeholder="Enter CAPTCHA Text" />
        <br />
        <input id="btnCheck" type="button" value="Check" onclick="ValidCaptcha();" class="button_css_blue"/>
        <label id="lblMessage"></label><br />
        <br />
    </div>

</body>
</html>
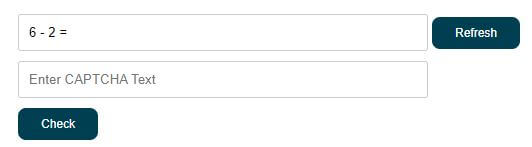
Sample Outcome of CAPTCHA Implementation
Initial CAPTCHA Page
The initial CAPTCHA page displays a randomly generated CAPTCHA challenge consisting of a simple arithmetic expression. Users are prompted to solve the
CAPTCHA by entering the result in a text input field. Upon loading the page, a new CAPTCHA challenge is generated automatically.
This page also provides a "Refresh" button to generate a new CAPTCHA challenge if needed.
Invalid CAPTCHA Page
If the user enters an incorrect answer for the CAPTCHA challenge, the page displays an error message indicating that the entered CAPTCHA is invalid.
The error message is styled to be prominently visible to the user, prompting them to reattempt the CAPTCHA challenge.

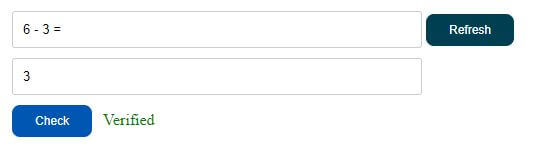
Valid CAPTCHA Page
When the user correctly solves the CAPTCHA challenge by entering the correct result, the page validates the input and displays a success message indicating
that the CAPTCHA is verified. The success message is displayed in a contrasting color to distinguish it from the error message. Additionally, any
further action associated with the CAPTCHA validation, such as form submission, can be triggered upon successful verification.
Related content