How to install Oracle database 21c on Linux Step-by-Step
In this article, we will learn how to install Oracle Database 21c on Linux. Whether you're an experienced database administrator or a beginner,
this step-by-step tutorial will help you set up Oracle Database 21c, ensuring a smooth and efficient installation.
We will cover the prerequisites, installation steps, and post-installation configurations to get your database up and running seamlessly on your Linux environment.
Installing Oracle Database 21c involves several steps, including downloading the software, preparing your system, and running the installation process.
Here is a step-by-step guide to installing Oracle 21c on a Linux system.
System Requirements and Preparation
Check System Requirements
Make sure your system meets the hardware and software requirements for Oracle 21c. You can find the requirements in the Oracle documentation. The following are some of the major requirements:
Check											|     Task
--------------------------------------------    -------------------------------------------------
Allocated disk space for the /tmp directory     |  At least 1 GB of space available in the /tmp directory.

Swap space allocation according to RAM  	    | 1 GB to 2 GB of RAM: 1.5 times the size of RAM
												| 2 GB to 16 GB of RAM: Equal to the size of RAM
												| More than 16 GB of RAM: 16 GB

Oracle Inventory (oraInventory)                 | Upgrades: The installer detects and uses the existing oraInventory directory from /etc/oraInst.loc
												| New Installs: If oraInventory is not configured, specify the directory during installation. Oracle Universal Installer will set it up according to Oracle Optimal Flexible Architecture.
												| OINSTALL Group: Must be the primary group for all Oracle software installation owners and writable by any Oracle installation owner.


Groups and users								| Create the necessary groups and user accounts for your security plans before starting the installation. Installation owners should have appropriate resource limits and other settings. Use only ASCII characters for group and user names

Mount point paths for the software Installation | Create them according to an Optimal Flexible Architecture configuration.
Download Oracle 21c software
Download Oracle 21c RPMs from MOS
Download Oracle 21c RPMs.
LINUX.X64_213000_db_home.zip
oracle-database-preinstall-21c-1.0-1.el8.x86_64.rpm
Oracle 21c Installation Prerequisites
Before installing Oracle Database 21c, certain preinstallation steps need to be performed. To accomplish this, follow these instructions below and execute the provided commands in
your terminal:
Configure the host file
The server's fully qualified name should be included in the
/etc/hosts file.
[root@dbdocs ~]# vi /etc/hosts
127.0.0.1   localhost localhost.localdomain localhost4 localhost4.localdomain4
::1         localhost localhost.localdomain localhost6 localhost6.localdomain6
192.168.xxx.xxx dbdocs
[root@dbdocs ~]#
Ensure that the accurate hostname is set within the
/etc/hostname file.
[root@dbdocs system-connections]# cat /etc/hostname
dbdocs
[root@dbdocs system-connections]#
Configure secure Linux to permissive
Configure secure Linux to permissive by editing the
/etc/selinux/config file and ensure the SELINUX flag is set as follows
[root@dbdocs ~]# vi /etc/selinux/config
SELINUX=permissive
SELINUXTYPE=targeted

--Run the following command to apply the changes and make them take effect:
[root@dbdocs ~]# setenforce Permissive
Disable firewall
If you have the Linux firewall enabled, you will need to disable or configure the firewall rules appropriately. To disable the firewall, follow these steps:
[root@dbdocs ~]# systemctl stop firewalld
[root@dbdocs ~]# systemctl disable firewalld
Install Oracle 21c Preinstall RPM
The Oracle Database Preinstallation RPM
oracle-database-preinstall-21c-1.0-1.el8.x86_64.rpm takes care of creating the Oracle installation owner and groups automatically. It also configures the necessary kernel settings for Oracle Database installations.
The Oracle preinstall RPM requires the following packages to be available; otherwise, the installation will fail.
sysstat compat-openssl10 glibc-devel ksh libnsl make
Install the missing packages
The following packages are required for the Oracle 21c pre-installation RPM. To install these packages, you will need to set up a Yum repository.
If you haven't set up a Yum repository yet, please refer to the tutorial
How to Configure an Offline Yum Repository in RHEL Linux for guidance.
[root@dbdocs yum.repos.d]# yum install sysstat compat-openssl10 glibc-devel ksh libnsl make
Red Hat Enterprise Linux 8.8.0                                                                                                          5.4 MB/s | 2.4 MB     00:00
Red Hat Enterprise Linux 8.8.0 - AppStream                                                                                               13 MB/s | 8.1 MB     00:00
Last metadata expiration check: 0:00:03 ago on Sun 26 May 2024 09:51:13 AM EDT.
Dependencies resolved.
========================================================================================================================================================================
 Package                              Architecture               Version                                               Repository                                  Size
========================================================================================================================================================================
Installing:
 compat-openssl10                     x86_64                     1:1.0.2o-4.el8_6                                      InstallMedia-AppStream                     1.1 M
 glibc-devel                          x86_64                     2.28-225.el8                                          InstallMedia                                83 k
 ksh                                  x86_64                     20120801-257.el8                                      InstallMedia-AppStream                     929 k
 libnsl                               x86_64                     2.28-225.el8                                          InstallMedia                               105 k
 make                                 x86_64                     1:4.2.1-11.el8                                        InstallMedia                               498 k
 sysstat                              x86_64                     11.7.3-9.el8                                          InstallMedia-AppStream                     426 k
Installing dependencies:
 glibc-headers                        x86_64                     2.28-225.el8                                          InstallMedia                               488 k
 kernel-headers                       x86_64                     4.18.0-477.10.1.el8_8                                 InstallMedia                                11 M
 libxcrypt-devel                      x86_64                     4.1.1-6.el8                                           InstallMedia                                25 k
 lm_sensors-libs                      x86_64                     3.4.0-23.20180522git70f7e08.el8                       InstallMedia                                59 k

Transaction Summary
========================================================================================================================================================================
Install  10 Packages

Total size: 14 M
Installed size: 17 M
Is this ok [y/N]: y
Downloading Packages:
Red Hat Enterprise Linux 8.8.0                                                                                                          213 kB/s | 5.0 kB     00:00
Running transaction check
Transaction check succeeded.
Running transaction test
Transaction test succeeded.
Running transaction
  Preparing        :                                                                                                                                                1/1
  Installing       : make-1:4.2.1-11.el8.x86_64                                                                                                                    1/10
  Running scriptlet: make-1:4.2.1-11.el8.x86_64                                                                                                                    1/10
  Installing       : lm_sensors-libs-3.4.0-23.20180522git70f7e08.el8.x86_64                                                                                        2/10
  Running scriptlet: lm_sensors-libs-3.4.0-23.20180522git70f7e08.el8.x86_64                                                                                        2/10
  Installing       : kernel-headers-4.18.0-477.10.1.el8_8.x86_64                                                                                                   3/10
  Running scriptlet: glibc-headers-2.28-225.el8.x86_64                                                                                                             4/10
  Installing       : glibc-headers-2.28-225.el8.x86_64                                                                                                             4/10
  Installing       : libxcrypt-devel-4.1.1-6.el8.x86_64                                                                                                            5/10
  Installing       : glibc-devel-2.28-225.el8.x86_64                                                                                                               6/10
  Running scriptlet: glibc-devel-2.28-225.el8.x86_64                                                                                                               6/10
  Installing       : sysstat-11.7.3-9.el8.x86_64                                                                                                                   7/10
  Running scriptlet: sysstat-11.7.3-9.el8.x86_64                                                                                                                   7/10
  Installing       : compat-openssl10-1:1.0.2o-4.el8_6.x86_64                                                                                                      8/10
  Running scriptlet: compat-openssl10-1:1.0.2o-4.el8_6.x86_64                                                                                                      8/10
  Installing       : ksh-20120801-257.el8.x86_64                                                                                                                   9/10
  Running scriptlet: ksh-20120801-257.el8.x86_64                                                                                                                   9/10
  Installing       : libnsl-2.28-225.el8.x86_64                                                                                                                   10/10
  Running scriptlet: libnsl-2.28-225.el8.x86_64                                                                                                                   10/10
  Verifying        : glibc-devel-2.28-225.el8.x86_64                                                                                                               1/10
  Verifying        : glibc-headers-2.28-225.el8.x86_64                                                                                                             2/10
  Verifying        : kernel-headers-4.18.0-477.10.1.el8_8.x86_64                                                                                                   3/10
  Verifying        : libnsl-2.28-225.el8.x86_64                                                                                                                    4/10
  Verifying        : libxcrypt-devel-4.1.1-6.el8.x86_64                                                                                                            5/10
  Verifying        : lm_sensors-libs-3.4.0-23.20180522git70f7e08.el8.x86_64                                                                                        6/10
  Verifying        : make-1:4.2.1-11.el8.x86_64                                                                                                                    7/10
  Verifying        : compat-openssl10-1:1.0.2o-4.el8_6.x86_64                                                                                                      8/10
  Verifying        : ksh-20120801-257.el8.x86_64                                                                                                                   9/10
  Verifying        : sysstat-11.7.3-9.el8.x86_64                                                                                                                  10/10
Installed products updated.

Installed:
  compat-openssl10-1:1.0.2o-4.el8_6.x86_64  glibc-devel-2.28-225.el8.x86_64  glibc-headers-2.28-225.el8.x86_64   kernel-headers-4.18.0-477.10.1.el8_8.x86_64
  ksh-20120801-257.el8.x86_64               libnsl-2.28-225.el8.x86_64       libxcrypt-devel-4.1.1-6.el8.x86_64  lm_sensors-libs-3.4.0-23.20180522git70f7e08.el8.x86_64
  make-1:4.2.1-11.el8.x86_64                sysstat-11.7.3-9.el8.x86_64

Complete!
[root@dbdocs yum.repos.d]#
Install the RPM
[root@dbdocs software]# yum install oracle-database-preinstall-21c-1.0-1.el8.x86_64.rpm
Last metadata expiration check: 333 days, 21:40:11 ago on Sun 26 May 2024 11:12:46 AM EDT.
Dependencies resolved.
===================================================================================================================================================================================================================
 Package                                                           Architecture                              Version                                         Repository                                       Size
===================================================================================================================================================================================================================
Installing:
 oracle-database-preinstall-21c                                    x86_64                                    1.0-1.el8                                       @commandline                                     30 k

Transaction Summary
===================================================================================================================================================================================================================
Install  1 Package

Total size: 30 k
Installed size: 76 k
Is this ok [y/N]: y
Downloading Packages:
Running transaction check
Transaction check succeeded.
Running transaction test
Transaction test succeeded.
Running transaction
  Preparing        :                                                                                                                                                                                           1/1
  Installing       : oracle-database-preinstall-21c-1.0-1.el8.x86_64                                                                                                                                           1/1
  Running scriptlet: oracle-database-preinstall-21c-1.0-1.el8.x86_64                                                                                                                                           1/1
  Verifying        : oracle-database-preinstall-21c-1.0-1.el8.x86_64                                                                                                                                           1/1
Installed products updated.

Installed:
  oracle-database-preinstall-21c-1.0-1.el8.x86_64

Complete!
[root@dbdocs software]#
To verify if the oracle user has been created by the preinstall RPM, you can use the following command:
[root@dbdocs software]# id oracle
uid=54321(oracle) gid=54321(oinstall) groups=54321(oinstall),54322(dba),54323(oper),54324(backupdba),54325(dgdba),54326(kmdba),54330(racdba)
[root@dbdocs software]#
This command will display information about the oracle user, including its UID (user ID), GID (group ID), and groups it belongs to. If the oracle user exists, it means that it has been created by the preinstall RPM.
Install the Oracle 21c database
During an installation, various steps are performed. These include preinstallation checks, extraction of the database software, assignment of ownership to the preconfigured
users and groups, management of the Oracle inventory, and execution of root operations needed to configure the Oracle Database software for creating and configuring a
single-instance Oracle Database.
If the minimum requirements for installation are not met, the installation process will identify this and prompt you to complete the necessary preinstallation requirements.
For the Oracle Database 21c, it typically requires around 9 GB of disk space under the
/opt directory. If the current disk partition doesn't have sufficient space available, you will need to either add space or mount an alternative partition as
/opt/oracle. This particular disk partition is designated as the Oracle base, where the software and database will be located.
Create a directory structure
Create the directories for installing the Oracle software, following the Oracle Optimal Flexible Architecture (OFA) guidelines.
Placing mount points directly under the root directory without mounting separate disks to them is generally not recommended. While it is done here for simplicity, in a real installation, the "/" storage should be reserved exclusively for the operating system.
[root@dbdocs ~]# mkdir -p /opt/oracle/product/21.3.0/dbhome_1
[root@dbdocs ~]# mkdir -p /u01/oradata
[root@dbdocs ~]# chown -R oracle:oinstall /opt /u01
[root@dbdocs ~]# chmod -R 775 /opt /u01
[root@dbdocs ~]#
Set user profile
[root@dbdocs ~]# su - oracle

[oracle@dbdocs ~]$ vi .bash_profile
# .bash_profile
# Get the aliases and functions
if [ -f ~/.bashrc ]; then
        . ~/.bashrc
fi

umask 022
ORACLE_SID=dbdocs
ORACLE_BASE=/opt/oracle
ORACLE_HOME=$ORACLE_BASE/product/21.3.0/dbhome_1
LD_LIBRARY_PATH=$ORACLE_HOME/lib
TMP=/tmp
TMPDIR=/tmp
PATH=$PATH:$ORACLE_HOME/bin:$ORACLE_HOME/OPatch
export ORACLE_SID ORACLE_BASE ORACLE_HOME LD_LIBRARY_PATH TMP TMPDIR PATH
[oracle@dbdocs ~]$

[oracle@dbdocs ~]$ source .bash_profile
[oracle@dbdocs ~]$ echo $ORACLE_SID
dbdocs
Unzip Oracle Software
Login as the "oracle" user and proceed to unzip the software. Place the Oracle software under the Oracle home directory.
[oracle@dbdocs software]$ ll
total 2988028
-rwxrwxr-x. 1 oracle oinstall 3059705302 Jun  8  2023 LINUX.X64_213000_db_home.zip
-rwxrwxr-x. 1 oracle oinstall      30772 May 31 08:41 oracle-database-preinstall-21c-1.0-1.el8.x86_64.rpm

[oracle@dbdocs software]$ unzip -q LINUX.X64_213000_db_home.zip -d /opt/oracle/product/21.3.0/dbhome_1/
Setup X Display
To set up the X display, please refer to the instructions provided in the
How to Setup X Display in Linux tutorial.
Oracle 21c Software Installation
Here, we launch the runInstaller GUI to commence the installation process. Navigate to the ORACLE_HOME location and run the installer.
[oracle@dbdocs dbhome_1]$ ./runInstaller
Choose the option
Set up Software Only from the selection menu
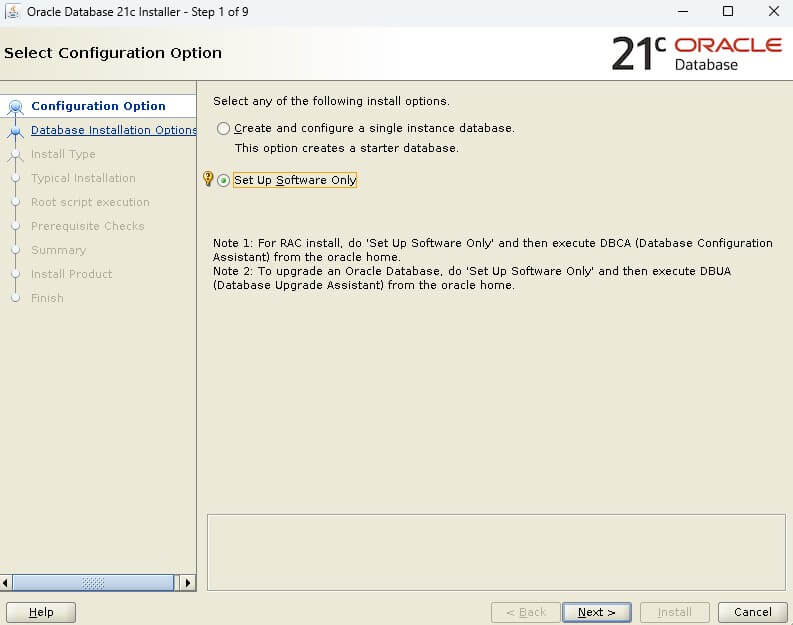
Choose the option
"Single Instance database Installation" from the selection menu
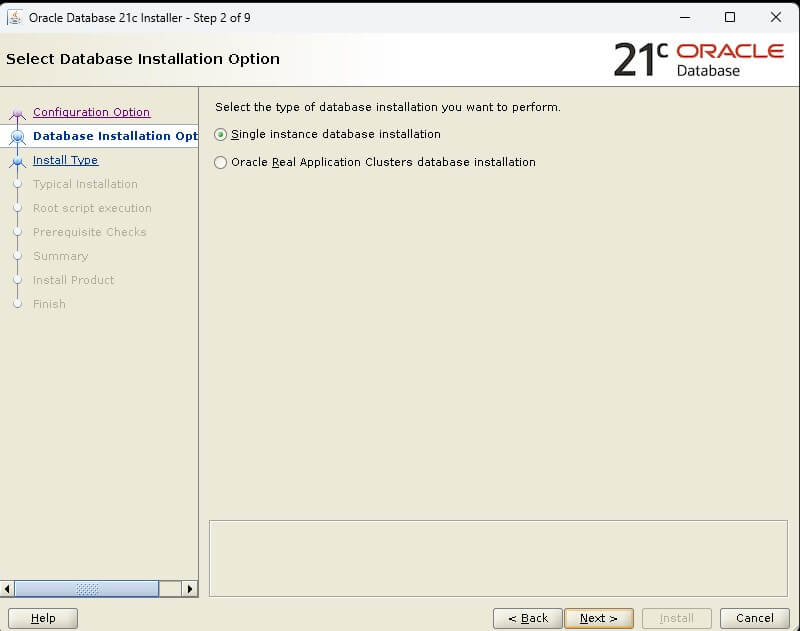
Select
"Enterprise Edition" from the available options.
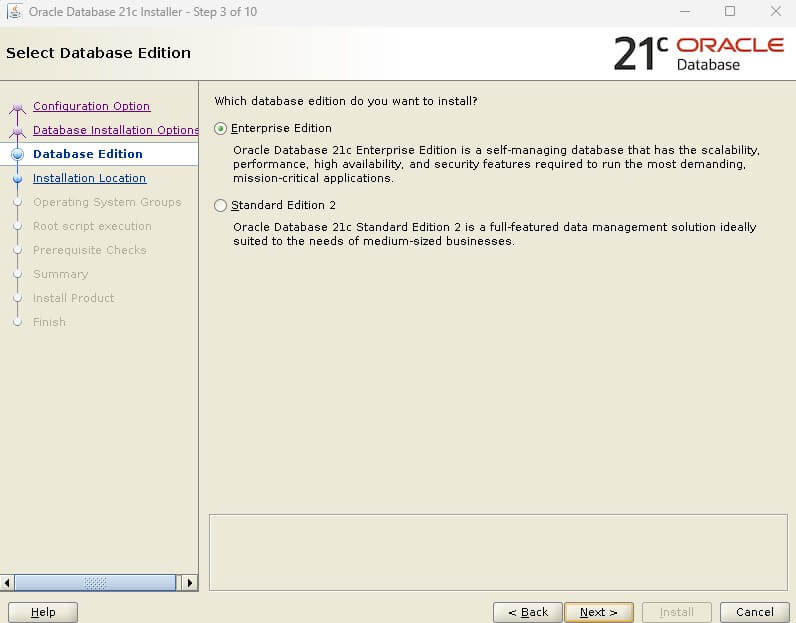
Specify the location of the
ORACLE_BASE
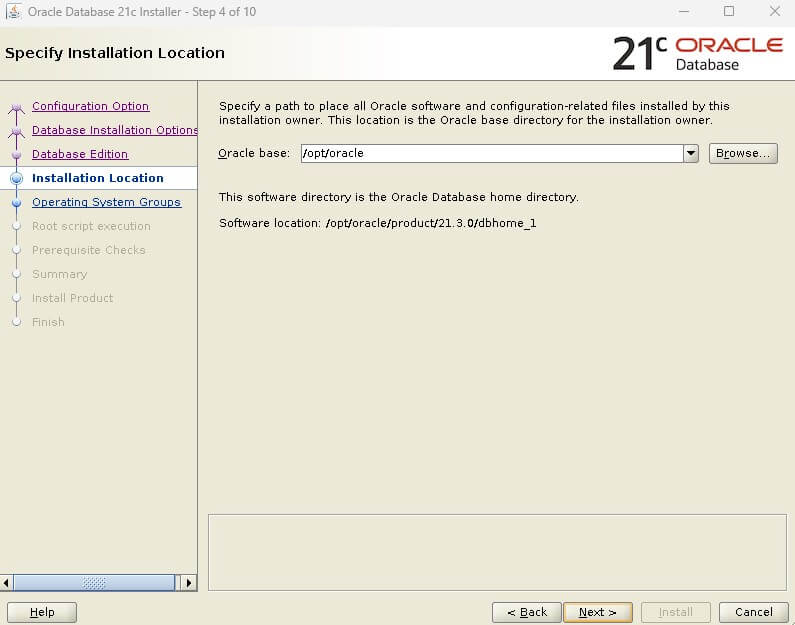
Specify the location of the
ORACLE Inventory
Select the appropriate
groups for the installation process
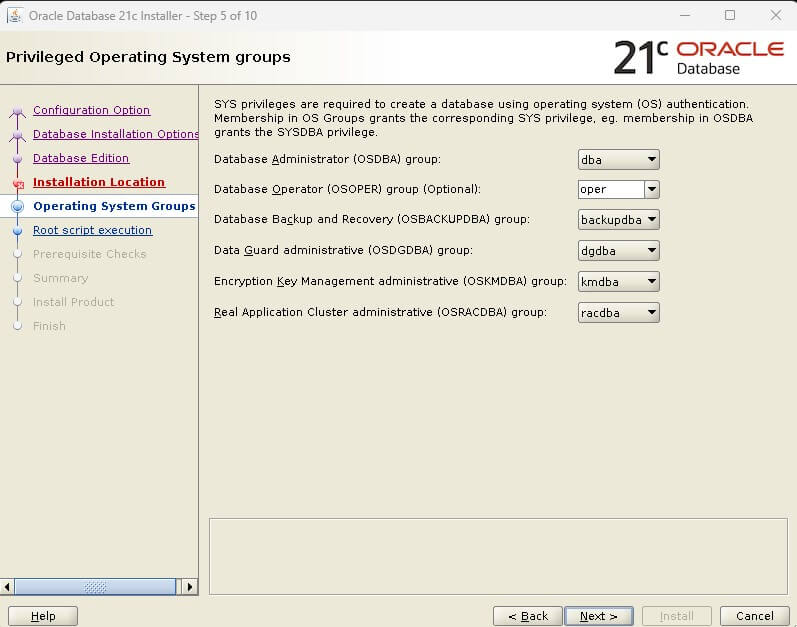
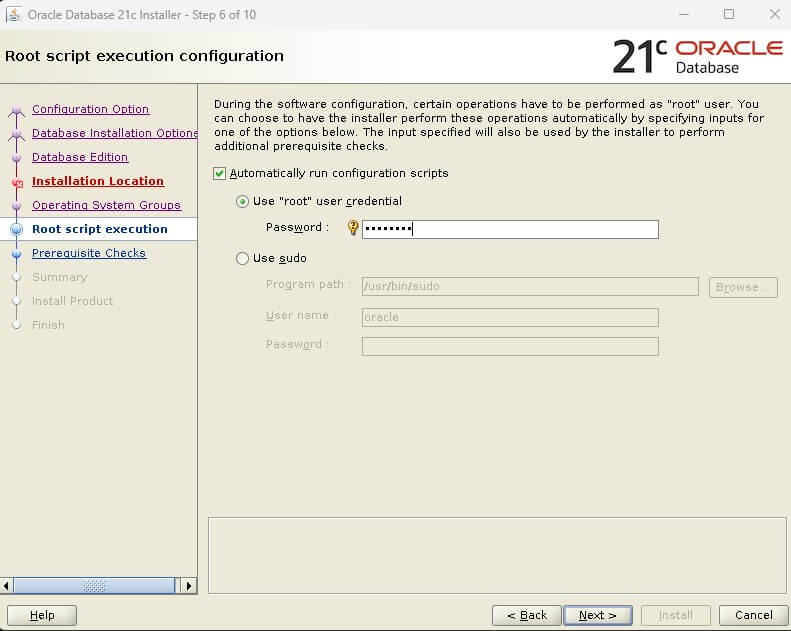
Specify the
root password for running configuration scripts
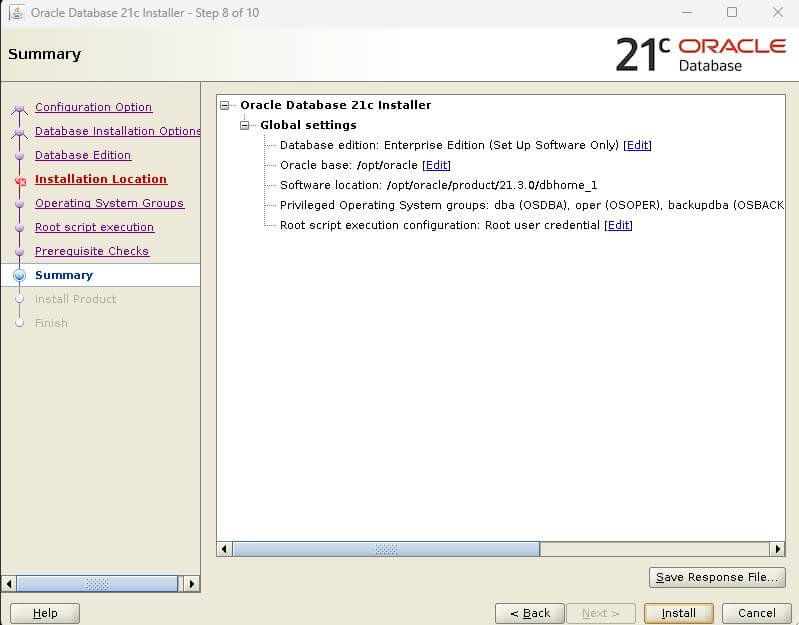
Click on
Install to proceed
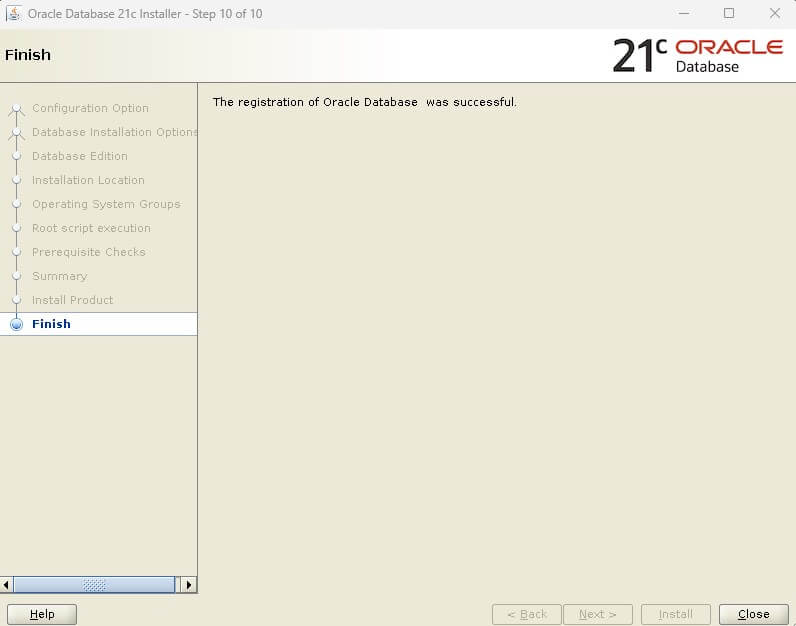
Oracle 21c
Software installation is complete now
Create an Oracle 21c database
Create a database
To create an Oracle 21c database, log in as the
oracle user and execute the
dbca command using the command prompt
    [oracle@dbdocs bin]$ cd /opt/oracle/product/21.3.0/dbhome_1/bin
    [oracle@dbdocs bin]$ ./dbca
Choose the option
"Create a database" from the selection menu
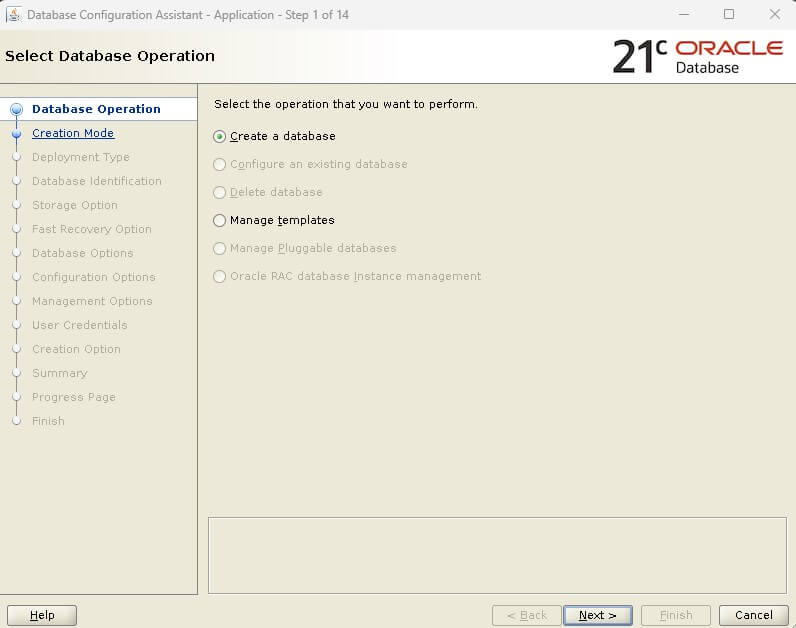
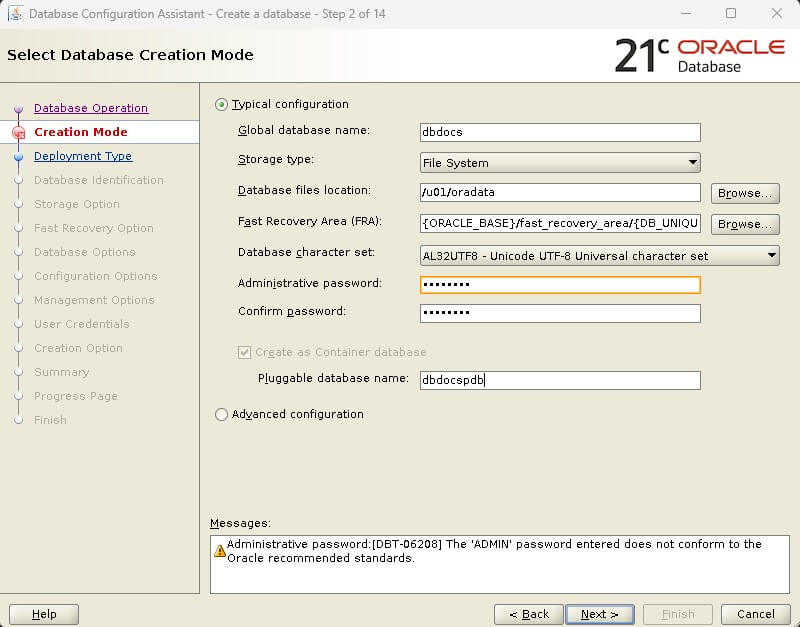
Enter the
Global database name,
Admin password, and
Pluggable database name
Click on
Next to continue
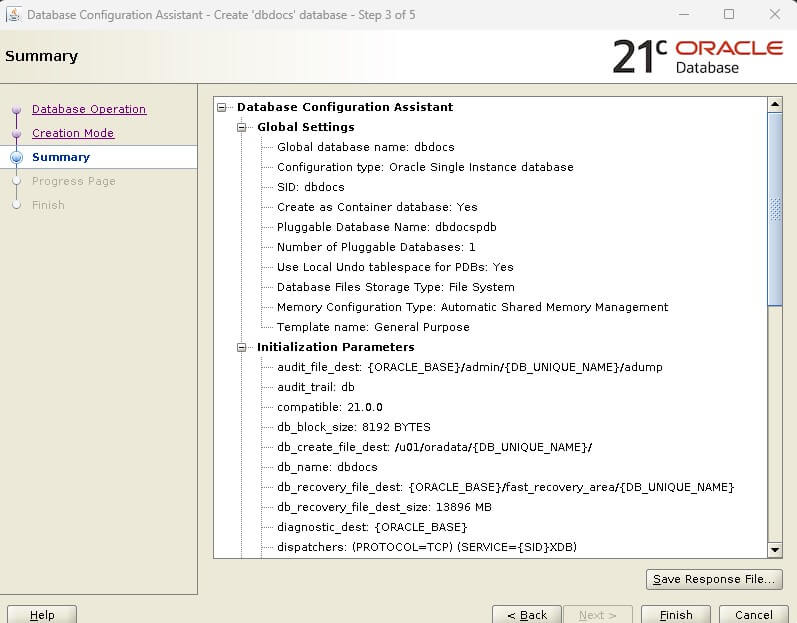
Validate the information and click on
Finish to continue
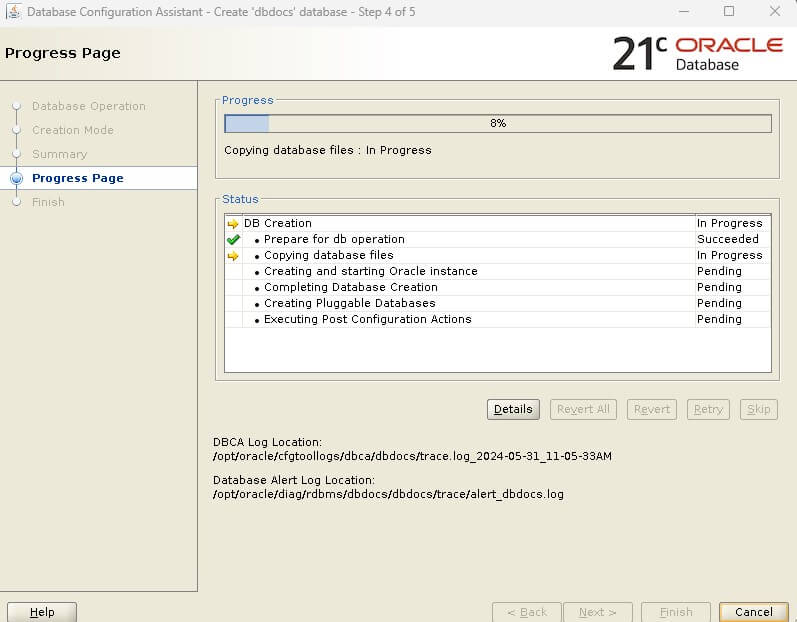
The database creation process has now commenced
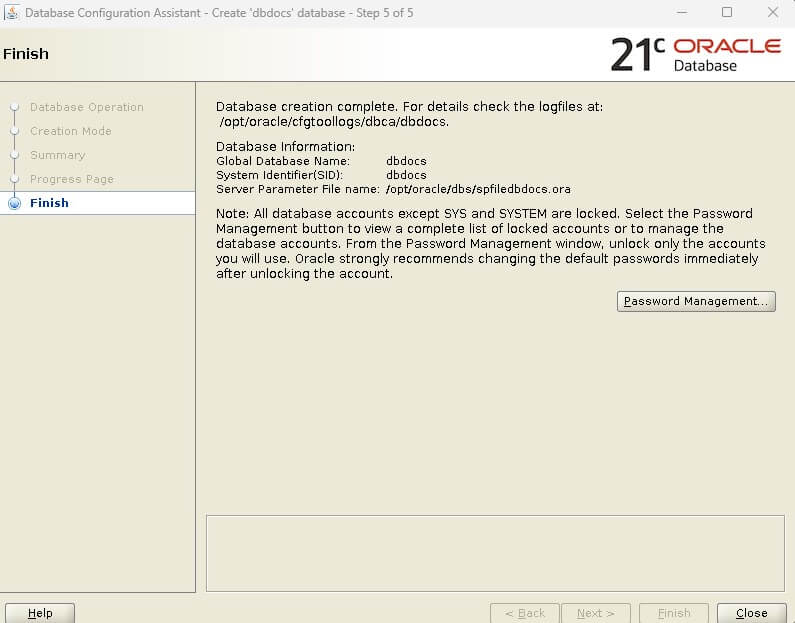
Oracle 21c database creation is complete now
[oracle@dbdocs ~]$ sqlplus
[oracle@dbdocs ~]$ sqlplus

SQL*Plus: Release 21.0.0.0.0 - Production on Fri May 31 11:19:27 2024
Version 21.3.0.0.0

Copyright (c) 1982, 2021, Oracle.  All rights reserved.

Enter user-name: / as sysdba

Connected to:
Oracle Database 21c Enterprise Edition Release 21.0.0.0.0 - Production
Version 21.3.0.0.0

SQL> select open_mode from v$database;

OPEN_MODE
--------------------
READ WRITE

SQL>
Configure the listener.ora file
Navigate to the $ORACLE_HOME/network/admin directory and create a listener.ora file.
[oracle@dbdocs admin]$ cd $ORACLE_HOME/network/admin

[oracle@dbdocs admin]$ vi listener.ora
LISTENER=
  (DESCRIPTION=
    (ADDRESS_LIST=
      (ADDRESS=(PROTOCOL=tcp)(HOST=dbdocs)(PORT=1521))
      (ADDRESS=(PROTOCOL=ipc)(KEY=extproc))))
SID_LIST_LISTENER=
  (SID_LIST=
    (SID_DESC=
      (GLOBAL_DBNAME=dbdocs)
      (ORACLE_HOME=/opt/oracle/product/21.3.0/dbhome_1)
      (SID_NAME=dbdocs))
)
Start the listener
[oracle@dbdocs admin]$ lsnrctl start

LSNRCTL for Linux: Version 21.0.0.0.0 - Production on 31-MAY-2024 11:25:24

Copyright (c) 1991, 2021, Oracle.  All rights reserved.

Starting /opt/oracle/product/21.3.0/dbhome_1/bin/tnslsnr: please wait...

TNSLSNR for Linux: Version 21.0.0.0.0 - Production
System parameter file is /opt/oracle/product/21.3.0/dbhome_1/network/admin/listener.ora
Log messages written to /opt/oracle/diag/tnslsnr/dbdocs/listener/alert/log.xml
Listening on: (DESCRIPTION=(ADDRESS=(PROTOCOL=tcp)(HOST=dbdocs)(PORT=1521)))
Listening on: (DESCRIPTION=(ADDRESS=(PROTOCOL=ipc)(KEY=extproc)))

Connecting to (DESCRIPTION=(ADDRESS=(PROTOCOL=tcp)(HOST=dbdocs)(PORT=1521)))
STATUS of the LISTENER
------------------------
Alias                     LISTENER
Version                   TNSLSNR for Linux: Version 21.0.0.0.0 - Production
Start Date                31-MAY-2024 11:25:24
Uptime                    0 days 0 hr. 0 min. 0 sec
Trace Level               off
Security                  ON: Local OS Authentication
SNMP                      OFF
Listener Parameter File   /opt/oracle/product/21.3.0/dbhome_1/network/admin/listener.ora
Listener Log File         /opt/oracle/diag/tnslsnr/dbdocs/listener/alert/log.xml
Listening Endpoints Summary...
  (DESCRIPTION=(ADDRESS=(PROTOCOL=tcp)(HOST=dbdocs)(PORT=1521)))
  (DESCRIPTION=(ADDRESS=(PROTOCOL=ipc)(KEY=extproc)))
Services Summary...
Service "dbdocs" has 1 instance(s).
  Instance "dbdocs", status UNKNOWN, has 1 handler(s) for this service...
The command completed successfully
Configure the tnsnames.ora file
Navigate to the $ORACLE_HOME/network/admin directory and create a tnsnames.ora file.
[oracle@dbdocs admin]$ vi tnsnames.ora
dbdocs =
  (DESCRIPTION =
    (ADDRESS_LIST =
      (ADDRESS = (PROTOCOL = TCP)(HOST = dbdocs)(PORT = 1521))
    )
    (CONNECT_DATA =
      (SERVICE_NAME = dbdocs)
    )
  )

dbdocspdb =
  (DESCRIPTION =
    (ADDRESS_LIST =
      (ADDRESS = (PROTOCOL = TCP)(HOST = dbdocs)(PORT = 1521))
    )
    (CONNECT_DATA =
      (SERVICE_NAME = dbdocspdb)
    )
  )
Test the connection to CDB and PDB
--CDB
[oracle@dbdocs admin]$ tnsping dbdocs

TNS Ping Utility for Linux: Version 21.0.0.0.0 - Production on 31-MAY-2024 11:28:05

Copyright (c) 1997, 2021, Oracle.  All rights reserved.

Used parameter files:


Used TNSNAMES adapter to resolve the alias
Attempting to contact (DESCRIPTION = (ADDRESS_LIST = (ADDRESS = (PROTOCOL = TCP)(HOST = dbdocs)(PORT = 1521))) (CONNECT_DATA = (SERVICE_NAME = dbdocs)))
OK (0 msec)

--PDB
[oracle@dbdocs admin]$ tnsping dbdocspdb

TNS Ping Utility for Linux: Version 21.0.0.0.0 - Production on 31-MAY-2024 11:28:16

Copyright (c) 1997, 2021, Oracle.  All rights reserved.

Used parameter files:


Used TNSNAMES adapter to resolve the alias
Attempting to contact (DESCRIPTION = (ADDRESS_LIST = (ADDRESS = (PROTOCOL = TCP)(HOST = dbdocs)(PORT = 1521))) (CONNECT_DATA = (SERVICE_NAME = dbdocspdb)))
OK (10 msec)
To learn about Oracle 23c new features, follow this article
Oracle 23c New Features: Redefine Your Business Success
Related content